Microsoft doesn't allow changing wallpapers, or modifying other personalized data settings on a non-activated Windows 10 PC. Since you are here, you must be looking for a working way to activate your copy of Windows operating system. In this tutorial, we will discuss how to activate Windows 10 or for that matter any version of Windows using a batch file CMD method.
Activating Windows 10 using a Batch File
To activate Windows 10 using a batch file, use these steps -
Turn Off Windows Defender
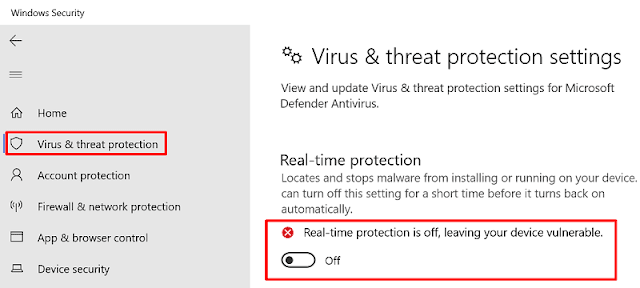
Before creating a batch file, you need to stop the Windows Defender. If not, the same will detect this file and delete it automatically. Here's how to disable Windows Defender -
- Click over the up arrow on the taskbar and select the Shield icon.
- When Windows Defender opens up, go to the Virus and Threat Protection tab.
- Jump to the right pane, and click Manage Settings under Virus & Threat Protection Settings.
- Disable the first three toggle switches on the next screen i.e. Real-time Protection, Cloud-delivered Protection, Automatic Sample Protection.
- That's it, you may now create the required batch file on your PC.
Create a Batch File
Now that you have turned off the real-time protection on Windows Defender, use the below guideline to create the required batch file.
- Open Notepad.
- Copy and Paste the code provided below -
- @echo off title Activate Windows 10 ALL versions for FREE!&cls&echo ============================================================================&echo #Project: Activating Microsoft software products for FREE without software&echo ============================================================================&echo.&echo #Supported products:&echo - Windows 10 Home&echo - Windows 10 Home N&echo - Windows 10 Home Single Language&echo - Windows 10 Home Country Specific&echo - Windows 10 Professional&echo - Windows 10 Professional N&echo - Windows 10 Education&echo - Windows 10 Education N&echo - Windows 10 Enterprise&echo - Windows 10 Enterprise N&echo - Windows 10 Enterprise LTSB&echo - Windows 10 Enterprise LTSB N&echo.&echo.&echo ============================================================================&echo Activating your Windows...&cscript //nologo slmgr.vbs /ckms >nul&cscript //nologo slmgr.vbs /upk >nul&cscript //nologo slmgr.vbs /cpky >nul&set i=1&wmic os | findstr /I "enterprise" >nul if %errorlevel% EQU 0 (cscript //nologo slmgr.vbs /ipk NPPR9-FWDCX-D2C8J-H872K-2YT43 >nul&cscript //nologo slmgr.vbs /ipk DPH2V-TTNVB-4X9Q3-TJR4H-KHJW4 >nul&cscript //nologo slmgr.vbs /ipk WNMTR-4C88C-JK8YV-HQ7T2-76DF9 >nul&cscript //nologo slmgr.vbs /ipk 2F77B-TNFGY-69QQF-B8YKP-D69TJ >nul&cscript //nologo slmgr.vbs /ipk DCPHK-NFMTC-H88MJ-PFHPY-QJ4BJ >nul&cscript //nologo slmgr.vbs /ipk QFFDN-GRT3P-VKWWX-X7T3R-8B639 >nul&goto server) else wmic os | findstr /I "home" >nul if %errorlevel% EQU 0 (cscript //nologo slmgr.vbs /ipk TX9XD-98N7V-6WMQ6-BX7FG-H8Q99 >nul&cscript //nologo slmgr.vbs /ipk 3KHY7-WNT83-DGQKR-F7HPR-844BM >nul&cscript //nologo slmgr.vbs /ipk 7HNRX-D7KGG-3K4RQ-4WPJ4-YTDFH >nul&cscript //nologo slmgr.vbs /ipk PVMJN-6DFY6-9CCP6-7BKTT-D3WVR >nul&goto server) else wmic os | findstr /I "education" >nul if %errorlevel% EQU 0 (cscript //nologo slmgr.vbs /ipk NW6C2-QMPVW-D7KKK-3GKT6-VCFB2 >nul&cscript //nologo slmgr.vbs /ipk 2WH4N-8QGBV-H22JP-CT43Q-MDWWJ >nul&goto server) else wmic os | findstr /I "10 pro" >nul if %errorlevel% EQU 0 (cscript //nologo slmgr.vbs /ipk W269N-WFGWX-YVC9B-4J6C9-T83GX >nul&cscript //nologo slmgr.vbs /ipk MH37W-N47XK-V7XM9-C7227-GCQG9 >nul&goto server) else (goto notsupported) :server if %i%==1 set KMS=kms7.MSGuides.com if %i%==2 set KMS=kms8.MSGuides.com if %i%==3 set KMS=kms9.MSGuides.com if %i%==4 goto notsupported cscript //nologo slmgr.vbs /skms %KMS%:1688 >nul&echo ============================================================================&echo.&echo. cscript //nologo slmgr.vbs /ato | find /i "successfully" && (echo.&echo ============================================================================&echo.&echo #My official blog: MSGuides.com&echo.&echo #How it works: bit.ly/kms-server&echo.&echo #Please feel free to contact me at msguides.com@gmail.com if you have any questions or concerns.&echo.&echo #Please consider supporting this project: donate.msguides.com&echo #Your support is helping me keep my servers running everyday!&echo.&echo ============================================================================&choice /n /c YN /m "Would you like to visit my blog [Y,N]?" & if errorlevel 2 exit) || (echo The connection to my KMS server failed! Trying to connect to another one... & echo Please wait... & echo. & echo. & set /a i+=1 & goto server) explorer "http://MSGuides.com"&goto halt :notsupported echo ============================================================================&echo.&echo Sorry! Your version is not supported.&echo. :halt pause >nul
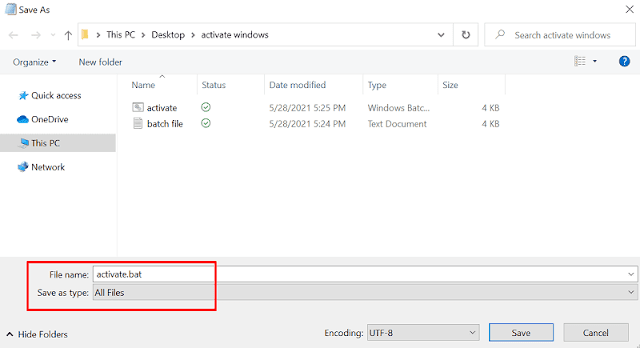
- Go to File Menu and click Save As.
- Under the File Name, put Activate.bat and select All Files under "Save As type".
- Lastly click the Save button.
- Your Batch File is now ready to activate Windows 10.
Activate Windows 10 using the newly created file
Keep Windows Defender disabled, and perform the below task to activate Windows 10.
- Right-click on the recently created bat file and hit Run as Administrator.
- If the UAC prompt appears next, hit Yes.
- Now wait till this batch file runs and activates your copy of Windows 10.
- When you receive the message - "Your Product activated successfully", close Command Prompt.
- Next, restart your PC.
- Sign back in to your device and turn On all settings that you have stopped previously on Windows Defender.
I hope you do activate Windows 10 following this way.


Comments
Post a Comment